Friday, January 22, 2010

Show administrater on welcome screen!

1.start > run = " control userpasswords2 " select administrator account, click reset password (input new pass) / Ok
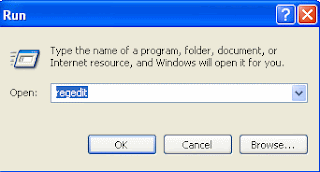
2. start > run = " regedit " create the key below
HKEY_LOCAL_MACHINE\SOFTWARE\Microsoft\Windows NT\CurrentVersion\Winlogon\SpecialAccounts\UserList
create "DWORD (32bit) Value"
Value Name: Administrator
Value Data: 1

How to install Windows Vista on a Fat32 partition

1.) Install Vista as normal on a lets say 20 GByte NTFS partition.
Dont install anything (driver, programs, updates) on this Vista because Microsoft gives you then Machinekeynumbers, that cant be copied with the Explorer (but with Winhex hihi...).
I use an IDE harddisk.
2.) Boot the same compi up from another XP ( I use an USB XP).
The harddisk with Vista stays connected.
3.) Copy all the files and folders from that Vista installation to a folder called Vista32.
Dont build the Vista32 folder on the partition with Vista, because this partition is deleted later!
Make sure, that in folder options all the system files are set visible.
hiberfil.sys, pagefile.sys, System Volume Information copy not.
4.) When you get a message, that a file cant be copied, use the program Beyond Compare 2 to look,
what has happend. You can do those copyoptions also by hand.
When you found that file or folder (I found 3, for example "Server") that cant be copied,
build this file or folder by hand and let it empty .
5.) Make a backup of your original Vista installation. I use Winhex and copy simple Byte by Byte of the installationsharddisk including the bootsector to a file called vista32.dat.
Remember, that on a Fat32 partition no single file can be larger than 4,1Gbyte.
So, this vista32.dat has to stay on a NTFS partition because it is about 20Gbyte large.
I tested this image and it works.
6.) Before you delete the partition with the original Vista on it with Partition Magic 8,
notice the exact size of this partition. Ok, delete this partition and build a new Fat32 partition at the same place with the same size as before on the same harddisk.
Set it aktiv.
7.) Now copy all the files and folders back from the Vista32 folder to that empty Fat32 partition.
Copy the Boot folder first and the Windows folder last.
8.) Disconnect your USB XP and/or any other harddisk.
Only the harddisk with the new Fat32 partition and the files and folders of Vista on it stays.
9.) When you try to start from that harddisk you get a message like no OS found.
10.) Put the Vista DVD in and hit any key.
11.) Chose install of Vista, but at the next place choose "Systemwiederherstellungsoptionen".
In the english version it must be like "systemrepair".
12.) Select a keyboard layout.
13.) Hit STRG ALT DEL and then choose no. (Means no restart of Vista)
14.) Hit "next", and then choose Command Prompt.
15.) Type cd and then the way to your DVD drive with the Vista DVD in it,
for me it is E: .
16.) Type there cd E:\boot .
17.) Then type there bootsect /nt60 C:
A message is shown, that a new bootsector for FAT32 is written!
18.) Put the Vista DVD out and shut the compi down.
When you boot up the next time, dont think that nothing happens. The harddisk seems to sleep
about 2 minutes. But then break through the light, voila there is the Vista Desktop with Fat32.
hiberfil.sys, pagefile.sys, System Volume Information have also been build new.

Install window media player 12 On windows VISTA !

1.window media player 12 is the next version of media player 11 which is genarally install in vista OS.
2.It is currently in beta mode and is planned to be released for only Windows 7. Although, Misaki2009 from deviantART has come up with a trick that will let windows vista users install windows media player 12 on their computers.
3.You only need 2 core files from the Windows Media Player 12 12.0.7000.7000 for Windows 7 Build 7000 and copy those to your windows vista system folders. You need to do the following two steps to install Windows Media Player 12 on Windows Vista.
4.
  • Copy wmploc.dll in C:\Windows\System32
  • Copy Windows Media Player folder to C:\Program Files
5.You can get the files by downloading the rar package from Here!


ENJOY The wmp12!

Install window media player 11 in XP !!

1.Download window media player 11 from here ! (x86 Bit).
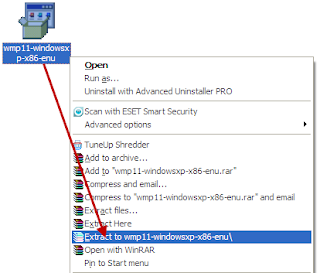
2. After that you need to open the downloaded exe file with WinRaR.
3.Extract all content from it.
4. After Extraction of WMP 11 exe you will get many files. You have to use only 6 Files of them (shown in image below). Just install those Files marked in Image as 1, 2, 3, 4, 5 and 6.


5. After installing just restart your OS.
6. Now open wmp 11 & enjoy.

Friday, January 8, 2010

Remove autorun virus fom your usb or laptops

Remove Autorun Virus Infection - Solution for USB, PC & Laptops.


Nowadays, there is a new problem that is cropping up in almost all schools,colleges, hostels etc. where the malicious Autorun Virus is Creating Havoc by spreading to Laptops and PC through USB Drives etc.


How to Stop the Autorun PC Virus Infection ?

The free Panda USB Vaccine allows users to vaccinate their PCs in order to disable Autorun completely so that no program from any USB/CD/DVD drive (regardless of whether they have been previously vaccinated or not) can auto-execute. This is a really helpful feature as there is no user friendly and easy way of completely disabling Autorun on a Windows PC.


Panda USB Vaccine is a 100% free utility. Its tested under Windows 2000 SP4, Windows XP SP1-SP3, and Windows Vista SP0 and SP1.

DOWNLOAD:-click here to get panda USB Vaccine

A FASTER START MENU***

I see no reason for there to be any delay when I click on the Start Menu. Effects are pretty, but I wouldn’t click on it if I didn’t have business inside, so lets get it open and get moving. The default speed can be adjusted with a quick registry entry.

The default value is 400. Set it to 0 and the delay is gone, but it will be nearly impossible to move the mouse fast enough not to activate [All Programs] if you mouse over it in route to your final selection. It's easy to train yourself to move the pointer to the right after clicking Start to avoid activating All Programs. Pick a number that suits your style and make the change, then test it until you find a good compromise between speed and usability.


[Start] [Run] [Regedit]
Registry Key: HKEY_CURRENT_USER\Control Panel\Desktop
Modify/Create the Value Data Type(s) and Value Name(s) as detailed below.
Data Type: String Value // Value Name: MenuShowDelay
Setting for Value Data: [Default = 400 / Adjust to Preference]
Exit Registry and Reboot

Wednesday, January 6, 2010

Boot your Computer Faster

  1. Press Start->run then type msconfig and press enter.
  2. Go to startup tab.here you will a list of startup items.These are all the programs that automatically start when you boot your pc.it is these that slowdown you bootup process.

Friday, January 1, 2010

How to disable the right click functionality on the desktop?

Follow the given steps to disable the right click functionality on desktop:
*To use this feature, you will need to be logged into your computer with administrative rights.
*Click Start button and type regedit in Run option then press Enter for next.


Here locate the location to:
HKEY_CURRENT_USER\Software\Microsoft\Windows\CurrentVersion\Policies\Explorer

*Here in right side panel, right click to create a new DWORD value with the name NoViewContextMenu (it is case sensitive), then assign number 1 in value data box.


Now close the registry editor and restart your computer after any changes to go into effect
*But next time, if you want to enable right click functionality on desktop then simply change the value of data box or delete the NoViewContextMenu DWORD item.

Show/Hide Hidden Files and Folders using Registry

Here's how to enable/disable hidden files/folders using the "Registry Editor"

Open the "Registry Editor" ("Start" >> "Run", then type "regedit" and Enter).
Expand to the following key:
HKEY_CURRENT_USER\Software\Microsoft\Windows\
CurrentVersion\Explorer\Advanced
If the value "Hidden" exists, double-click on it to edit its value to (1 = show hidden, 2 = do not show)
If the value "Hidden" does not exist, create it as follows
Name: Hidden
Type: DWORD
Value: 1
(1: show hidden, 2: do not show)